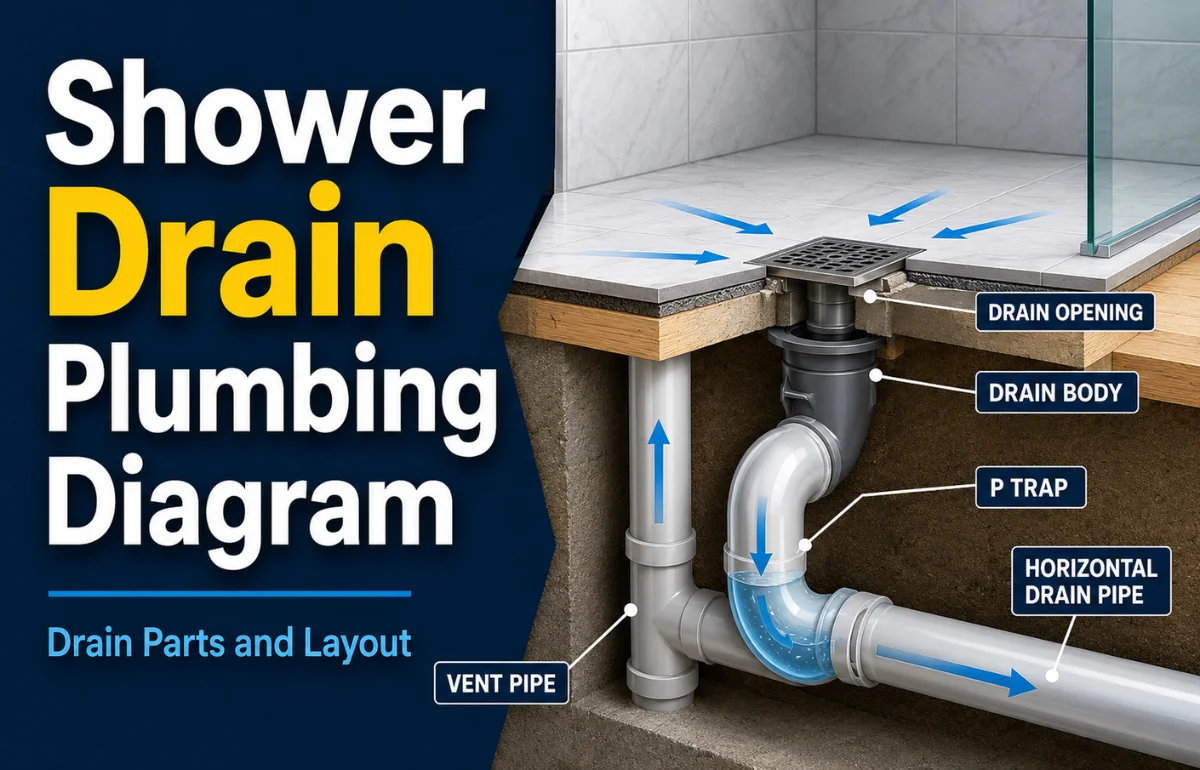
A shower drain plumbing diagram is a visual layout showing how water moves from the shower floor through the drain assembly, P-trap, trap arm, vent, branch drain, and eventually into the building’s main drainage system. It can also show how the plumbing vent allows air into the system so wastewater flows freely without siphoning water out of the trap.
When I read a shower drain plumbing diagram, I look at more than the drain pipe itself. I trace three separate paths: the path of wastewater, the path of air through the venting system, and the path that prevents water from leaking into the floor structure. Understanding all three makes it much easier to identify plumbing parts, plan a remodel, or narrow down the cause of a slow, smelly, or leaking shower drain.
What Does a Shower Drain Plumbing Diagram Show?
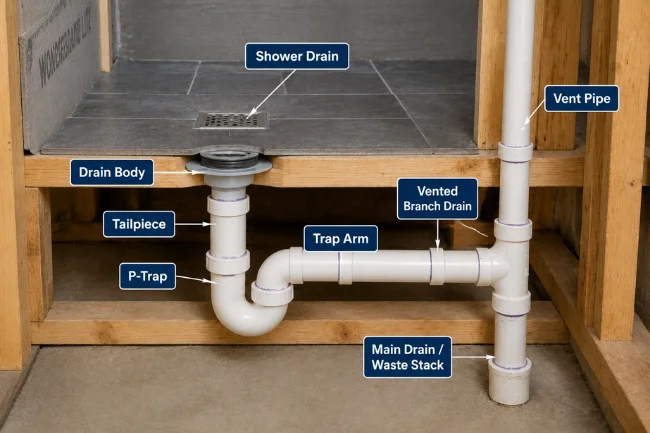
A useful shower drain diagram should show the complete drainage route underneath the shower rather than only the visible drain opening.
In a typical installation, the layout looks roughly like this:
Shower drain → drain body or tailpiece → P-trap → trap arm → vented branch drain → main drain or waste stack
The exact configuration changes according to the type of shower, framing, pipe material, local plumbing code, and location of nearby fixtures.
The parts are connected for different reasons. The drain collects water, the trap blocks sewer gases, the drain pipe carries wastewater away, and the vent keeps air pressure inside the drainage system balanced.
Main Parts of a Shower Drain System
| Component | What It Does | What Can Go Wrong |
|---|---|---|
| Drain cover or strainer | Stops larger debris from entering the pipe | Hair and soap buildup |
| Drain body | Connects the shower base to the drainage piping | Loose seal or failed gasket |
| Tailpiece/riser | Connects the drain body to the trap | Cracks, poor alignment |
| P-trap | Holds a water seal that blocks sewer gases | Clogs, dry trap, siphoning |
| Trap arm | Carries water from the trap toward the branch drain | Poor slope or improper venting |
| Vent pipe | Balances air pressure in the drainage system | Blockage or incorrect placement |
| Branch drain | Carries shower wastewater toward a larger drain | Buildup, poor slope |
| Main waste line | Carries wastewater out of the building | Major blockage or damage |
One detail homeowners often miss is that the drain cover is not the entire shower drain. Underneath the finished surface is a drain body that must connect securely to both the plumbing and the shower’s waterproofing system.
How a Shower Drain Plumbing System Works
When water reaches the shower drain, gravity pulls it down through the drain body and into the P-trap.
The P-trap is the curved section of pipe underneath the shower. A small amount of water remains inside the bend after the shower stops running.
That standing water creates a seal between the bathroom and the sanitary drainage system. Without the trap seal, sewer gases could travel back through the pipe and enter the room.
After passing through the P-trap, wastewater travels through the trap arm and into a larger branch drain.
From there, it eventually joins the building drain and sewer or septic system.
Why the Vent Is Just as Important as the Drain
A drain cannot work properly by gravity alone if air pressure inside the piping is constantly changing.
As wastewater moves through a pipe, it displaces air. The plumbing vent allows air to enter or leave the drainage system so water can continue moving without creating excessive negative pressure.
I find it helpful to think of a vented drain like pouring liquid from a container with an air opening. When air can replace the moving liquid, flow remains smooth. When airflow is restricted, drainage can become noisy or irregular.
Improper venting may contribute to:
- Gurgling sounds
- Slow drainage
- Trap-seal problems
- Sewer odors
- Unstable drainage performance
A gurgling shower does not automatically mean the vent is blocked, but venting should be considered when ordinary drain cleaning does not solve the problem.
How to Read a Shower Drain Plumbing Diagram
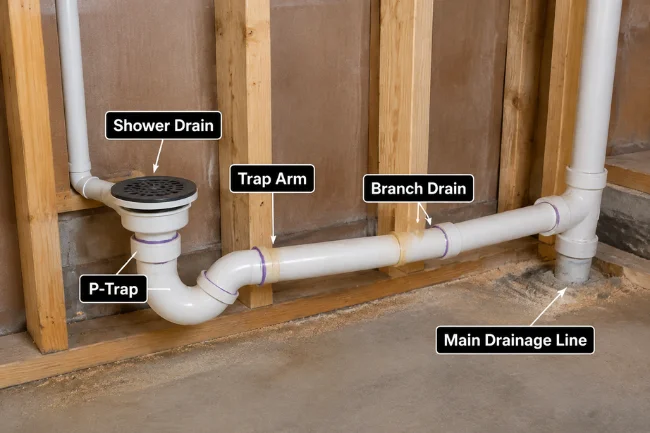
Instead of trying to understand every fitting at once, I use a three-path method.
1. Trace the Water Path
Start at the shower opening and follow the drain downstream.
Look for:
Drain → P-trap → trap arm → branch drain → main drainage line
The piping should continuously carry wastewater toward the sewer without reducing pipe size in the direction of flow.
2. Trace the Air Path
Next, locate the vent connection.
The vent typically rises from the drainage system and eventually connects into the building’s venting network.
Its job is not to carry ordinary shower wastewater. Its primary role is maintaining acceptable pressure inside the drainage system.
3. Trace the Waterproofing Path
This third path is rarely explained clearly enough.
A perfectly installed P-trap will not prevent a shower from leaking if water can escape around the drain body.
The finished shower floor, waterproof membrane, shower receptor, drain flange, and drain assembly must work together to direct water into the drainage system rather than into the subfloor or ceiling below.
That is why a plumbing diagram and a shower waterproofing detail are related but not identical.
Shower Drain Pipe Size and Slope
There is no single pipe-size rule that applies everywhere.
Requirements depend on the plumbing code adopted in your jurisdiction, shower flow rate, installation type, and sometimes local amendments.
For example, the 2024 International Residential Code lists a minimum shower drain outlet of 1½ inches and sizes shower traps according to total shower flow. Other codes and jurisdictions may require or commonly use a 2-inch shower waste outlet.
That difference is why I would never treat an internet diagram as a substitute for checking the code applicable to the property.
For horizontal drainage piping 2½ inches or smaller, the 2024 International Plumbing Code specifies a minimum slope of ¼ inch per foot.
In practical terms, the pipe must fall consistently toward the downstream drainage connection. More slope is not automatically better because excessive fall can also affect trap-arm and vent relationships.
Trap-to-Vent Distance Matters
The vent cannot simply be placed anywhere downstream.
Under the 2024 IPC, the allowable developed distance between a fixture trap and its vent depends on trap size and pipe slope. For example, its table permits up to 8 feet for a 2-inch trap arm at ¼ inch per foot slope.
That is a code-specific example, not a universal installation rule.
If you are in Canada, remember that the National Plumbing Code of Canada establishes technical requirements nationally, but provinces, territories, and municipalities determine which edition and amendments apply in their jurisdiction.
P-Trap Placement in a Shower Drain Diagram
The P-trap should appear directly downstream of the shower drain.
A common misconception is that a shower can simply connect into a horizontal waste line and rely on another trap elsewhere. In a properly designed plumbing system, the shower fixture requires an appropriate trap arrangement that protects the fixture from sewer gases.
The vertical section between the shower drain and P-trap should also be kept consistent with the approved layout rather than being extended arbitrarily.
If a remodeling project requires moving a shower several feet, the job may involve much more than extending a pipe. Trap position, venting, slope, joist locations, branch-drain capacity, and waterproofing can all change.
Point Drain vs. Linear Shower Drain Plumbing
Not every shower drain diagram looks the same.
A traditional point drain usually sits near the center or one side of the shower floor. A linear drain is longer and often installed near a wall or across one end of a walk-in shower.
| Feature | Point Drain | Linear Drain |
|---|---|---|
| Drain shape | Round or square | Long rectangular channel |
| Floor slope | Usually slopes from several directions | Can often slope in one primary direction |
| Typical use | Standard showers | Walk-in and curbless showers |
| Plumbing below | Usually one drain outlet and trap | Still requires an outlet, trap, drainage and venting |
| Installation sensitivity | Moderate | High, especially at waterproofing connection |
A linear drain may look very different above the floor, but the basic plumbing principles underneath remain familiar: wastewater still needs an approved drain connection, trap, correctly sloped waste piping, and adequate venting.
How Waterproofing Connects to the Shower Drain
This is one of the most important parts of the system and one of the easiest to overlook when studying a basic shower drain plumbing diagram.
Water does not only hit the visible drain cover. In a tiled shower, moisture can also reach the waterproofing layer beneath the finished surface.
Depending on the shower system, the waterproof layer may connect to a clamping-style drain, bonding flange, prefabricated receptor, or another manufacturer-approved drain assembly.
The connection must remain watertight.
A leak around this area can produce symptoms that look like a plumbing leak even when the P-trap and waste pipe are intact.
For example, if water appears on the ceiling below only while the shower is being used, possible sources include:
- Drain-body connection
- Failed gasket
- Waterproofing-to-drain connection
- Cracked shower receptor
- Drain piping joint
- Supply plumbing or shower valve
The timing and location of the leak help narrow the possibilities.
Common Shower Drain Problems and What the Diagram Can Tell You
A good diagram becomes much more useful when you connect symptoms to specific parts of the plumbing.
| Symptom | Likely Areas to Check | Possible Cause |
|---|---|---|
| Water drains slowly | Strainer, trap, trap arm | Hair, soap buildup, partial clog |
| Water backs up quickly | Drain or P-trap | Heavy obstruction |
| Sewer smell | P-trap, drain seal, venting | Dry trap, lost trap seal, buildup |
| Gurgling | Trap arm or venting system | Air-pressure issue or downstream restriction |
| Water below shower | Drain body, gasket, pipe joints, waterproofing | Failed seal or leaking connection |
| Several fixtures drain slowly | Branch or main drain | Larger downstream blockage |
One useful diagnostic distinction is whether only the shower is affected.
If one shower drains slowly while every other fixture works normally, the restriction is more likely to be relatively close to that shower.
If the shower, toilet, and sink begin backing up together, the problem may be farther downstream in a shared branch or main drainage line.
Shower Drain Materials: PVC, ABS, and Other Systems
Residential shower drainage is commonly assembled using approved plastic drainage piping such as PVC or ABS, depending on jurisdiction and existing construction.
You should not assume different pipe materials can simply be glued together with whatever cement is available.
Transitions between different materials require approved methods and compatible fittings.
Older properties may also contain cast iron, copper DWV piping, or other systems that make a shower conversion more complicated than a modern diagram suggests.
Before modifying an existing drain, identify both the nominal pipe size and material.
Why Tub-to-Shower Conversions Need Extra Attention
Replacing a bathtub with a walk-in shower looks simple above the floor, but the drainage arrangement may require changes.
Bathtub and shower requirements are not necessarily identical.
For example, the 2024 IPC lists a 1½-inch minimum trap for a bathtub, while shower trap sizing varies according to total shower flow.
The existing trap location may also be wrong for the new shower drain position.
This is why I would not recommend connecting a new shower drain to an old tub drain solely because the pipes appear to line up.
A proper conversion should consider:
- Existing drain size
- Trap size and position
- Shower flow rate
- Venting
- Branch-drain capacity
- Floor framing
- Shower base requirements
- Waterproofing
- Local code
When a Shower Drain Layout Needs a Plumber
Clearing hair from a removable strainer is very different from altering concealed drainage piping.
I would consider professional help when the job involves moving the P-trap, cutting structural framing, changing drain sizes, altering vents, connecting to a stack, working inside a concrete slab, or rebuilding the waterproof shower receptor.
A plumber can also determine whether the diagram you are using matches the actual code adopted locally.
That matters because plumbing-code requirements differ between countries, states, provinces, municipalities, and code editions.
A Better Way to Think About the Whole System
If you remember only one idea from a shower drain plumbing diagram, remember this:
A reliable shower needs drainage, air, and waterproofing working together.
The drainage piping moves wastewater.
The P-trap maintains a water barrier against sewer gases.
The vent protects drainage performance and the trap seal.
The waterproofing system keeps water inside the shower assembly until it reaches the drain.
A diagram that shows only a curved pipe under the shower tells only part of the story.
FAQs About Shower Drain Plumbing Diagrams
Does a shower drain need a P-trap?
Yes. A shower normally requires a trapped drain so a water seal can prevent sewer gases from entering the bathroom.
What size pipe is used for a shower drain?
The required size depends on the adopted plumbing code and shower flow rate. Many installations use 2-inch piping, but some current codes permit 1½-inch drainage for qualifying showers.
How far can a shower P-trap be from the vent?
It depends on pipe diameter, slope, and the plumbing code being followed. Under the 2024 IPC, a 2-inch trap arm at ¼-inch-per-foot slope can have a maximum developed length of 8 feet.
Why does my shower drain gurgle?
Gurgling can indicate restricted drainage or an air-pressure problem involving the venting system. A plumber may need to inspect both the drain and vent if cleaning the trap does not help.
Does a shower drain need to be directly over the P-trap?
The trap is normally located close to and downstream of the shower outlet, but the exact permitted arrangement depends on the approved drainage layout and local plumbing code.
Final Check Before You Close the Floor
A shower drain plumbing diagram should help you see the entire system, not simply identify a P-trap. Before installing or remodeling a shower, trace the drain body, trap, trap arm, vent, branch drain, waterproofing connection, pipe slope, and final waste connection.
If you are planning a new shower or moving an existing drain, use the diagram as a planning tool and have the final layout checked against your local plumbing code before concealed piping or waterproofing is closed in. Correcting a drain on paper is much easier than correcting it underneath a finished shower floor.

Olivia Parker is a home improvement research writer with 8+ years of experience covering home design, renovation ideas, maintenance tips, and practical living solutions. She creates easy-to-follow content to help readers make informed decisions about improving their homes.