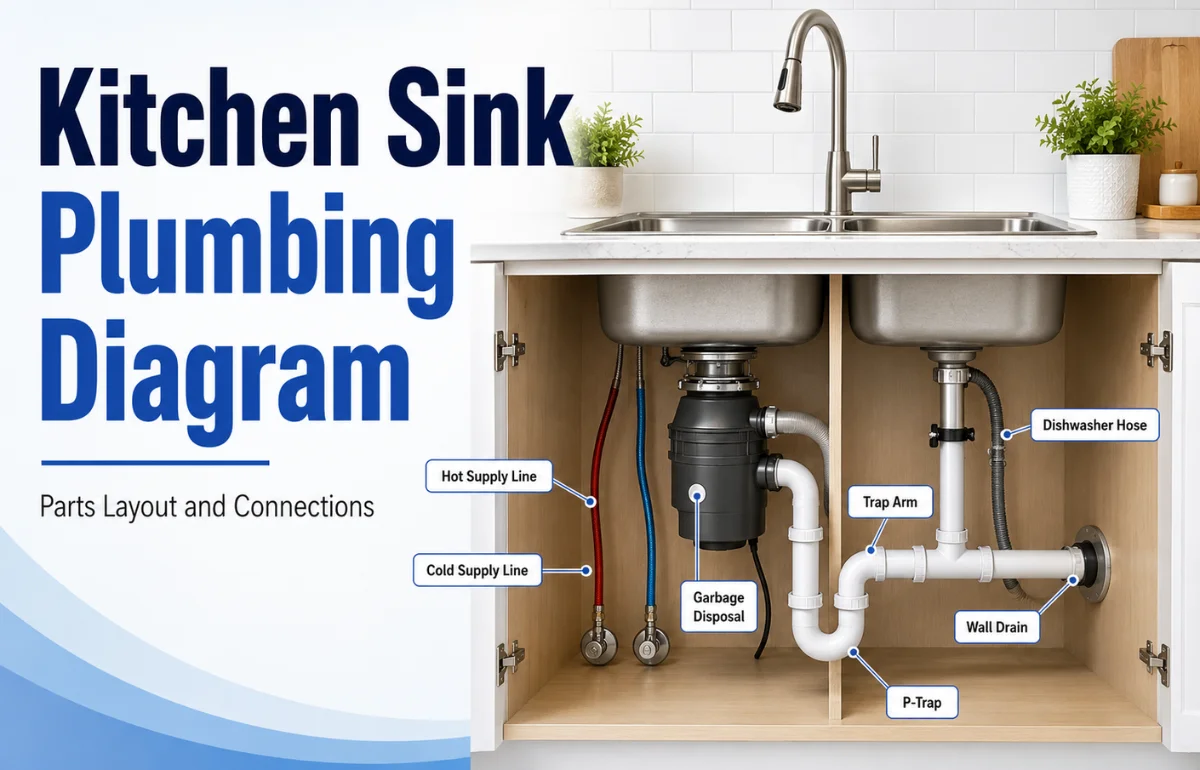
A kitchen sink plumbing diagram is a visual map showing how the water supply, drain, trap, vent, faucet, garbage disposal, and dishwasher connections fit together beneath and behind a kitchen sink. It helps homeowners, remodelers, and DIYers understand where each pipe goes and how wastewater moves safely from the sink into the home’s drainage system.
I find it easiest to understand a kitchen sink plumbing diagram by dividing it into two systems: the water coming in and the wastewater going out. The supply lines deliver hot and cold water to the faucet, while the drain assembly carries used water through the P-trap, trap arm, and household drain. Depending on the setup, the diagram may also include a garbage disposal, dishwasher hose, air admittance valve, or conventional vent pipe.
Understanding that layout before replacing a sink can prevent leaks, slow drainage, bad odors, and costly plumbing changes later.
Main Parts Shown in a Kitchen Sink Plumbing Diagram
Although plumbing layouts vary between homes, most kitchen sink systems use the same basic components.
Faucet and Water Supply Lines
The faucet receives water through separate hot and cold supply lines. Flexible braided supply hoses usually connect the faucet to shut-off valves installed below the sink.
The shut-off valves allow water to be stopped at the sink without shutting down the water supply to the entire house.
I recommend locating and testing these valves before doing any plumbing work. An old valve that will not close completely can turn a simple faucet replacement into a much bigger problem.
Sink Strainer
The sink strainer sits inside the drain opening at the bottom of the basin. It allows water to pass through while helping keep food scraps and larger debris out of the drain.
A rubber gasket, plumber’s putty, or another approved sealing method is typically used to prevent water from leaking around the strainer.
Tailpiece
The tailpiece is the vertical section of pipe running downward from the sink strainer.
On sinks without a garbage disposal, it normally connects the strainer to the P-trap or another fitting in the waste assembly.
P-Trap
The curved pipe below the sink is called the P-trap.
It holds a small amount of water after the sink drains. That water creates a seal that helps prevent sewer gases from traveling through the drain and entering the kitchen.
A properly installed P-trap should remain accessible because it is one of the first places I would check when diagnosing a clog or retrieving an object that accidentally fell down the sink.
Trap Arm
The trap arm is the horizontal pipe leaving the P-trap and traveling toward the drain connection in the wall.
It is more important than many simplified diagrams suggest. Its length, slope, diameter, and relationship to the vent can affect how well the sink drains.
Drain and Waste Pipe
The trap arm eventually connects to the home’s drainage system. Wastewater then moves through larger branch drains toward the building drain and sewer or septic system.
Kitchen drains are usually installed with a slight downward slope so gravity can move wastewater while keeping solids suspended in the flow.
Vent Pipe
A plumbing vent allows air into the drainage system.
Without proper venting, flowing wastewater can create pressure changes that cause slow drainage, gurgling sounds, or loss of water from the P-trap.
Some installations use a conventional vent running through the wall and roof. Others may use an approved air admittance valve where local plumbing rules permit one.
Basic Kitchen Sink Plumbing Layout
A simple single-bowl kitchen sink typically follows this path:
Sink basin → strainer → tailpiece → P-trap → trap arm → wall drain
The faucet plumbing runs separately:
Hot-water pipe → shut-off valve → supply hose → faucet
Cold-water pipe → shut-off valve → supply hose → faucet
That is the simplest kitchen sink plumbing diagram, but many modern kitchens add appliances and additional drain connections.
| Component | Main Function | Where It Is Usually Located |
|---|---|---|
| Faucet | Delivers hot and cold water | Above the sink |
| Supply lines | Carry water to faucet | Under sink |
| Shut-off valves | Stop water locally | On supply pipes |
| Strainer | Connects basin to drain | Bottom of sink |
| Tailpiece | Carries water downward | Below strainer |
| P-trap | Blocks sewer gases | Below sink |
| Trap arm | Connects trap to wall drain | Horizontal under-sink pipe |
| Vent | Balances drain pressure | Wall, roof, or approved valve |
| Drain pipe | Carries wastewater away | Inside wall/floor |
Kitchen Sink Plumbing Diagram With Garbage Disposal
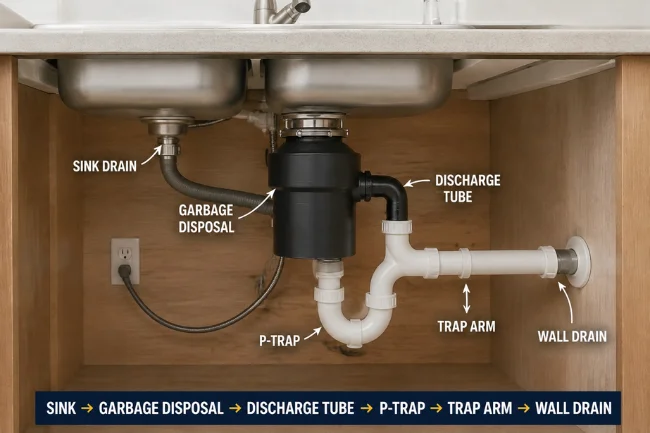
A garbage disposal changes the drain arrangement because it replaces the normal tailpiece beneath one sink drain.
Wastewater flows from the sink directly into the disposal chamber before leaving through the disposal’s discharge outlet.
The general arrangement becomes:
Sink → garbage disposal → discharge tube → P-trap → trap arm → wall drain
One detail homeowners often overlook is drain height.
If a deep replacement sink is installed while the wall drain remains high, there may not be enough vertical space for the disposal outlet and P-trap to drain correctly.
That is why I recommend checking the wall drain elevation before buying an unusually deep sink or large garbage disposal.
A sink that is only a few inches deeper than the previous model can create a surprisingly difficult plumbing problem.
Double Kitchen Sink Plumbing Diagram
A double-bowl sink usually combines wastewater from both bowls before it reaches the P-trap.
One common arrangement uses a continuous-waste assembly connecting the two sink outlets.
The basic flow may look like:
Left sink → waste connector
Right sink → waste connector
Combined drain → P-trap → trap arm → wall drain
If one bowl has a garbage disposal, the configuration changes.
The non-disposal bowl typically connects into the waste assembly before wastewater reaches the P-trap.
The exact arrangement depends on the sink, disposal, available cabinet space, and local plumbing requirements.
Single Sink vs. Double Sink Plumbing
| Feature | Single-Bowl Sink | Double-Bowl Sink |
|---|---|---|
| Drain connections | One | Two |
| Waste fittings | Simple | More complex |
| Cabinet space required | Less | More |
| Disposal installation | Straightforward | Depends on bowl configuration |
| Leak points | Fewer | More fittings can create more potential leak points |
| Installation difficulty | Lower | Moderate |
Kitchen Sink Plumbing Diagram With Dishwasher
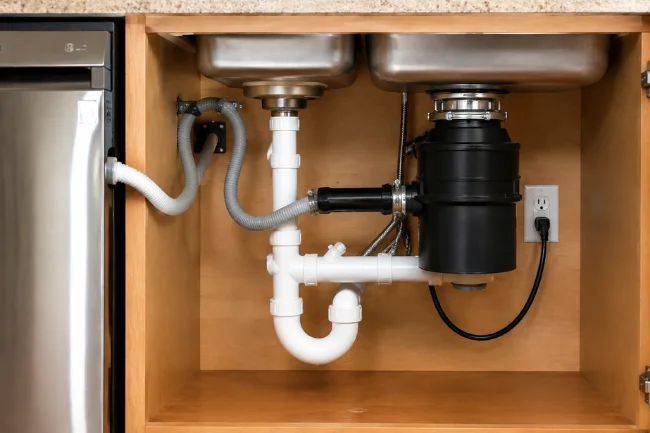
Dishwashers usually discharge wastewater through a flexible drain hose.
The hose commonly connects to either:
- a garbage disposal dishwasher inlet, or
- a dishwasher branch connection on the sink drain assembly.
The dishwasher drain hose should not simply run downward from the appliance directly into the drain connection.
A high-loop arrangement is commonly used to help reduce the chance of dirty sink water flowing backward into the dishwasher. Some jurisdictions or installations may require an air gap instead.
Because dishwasher requirements vary, I recommend checking the appliance manufacturer’s instructions and local plumbing rules before choosing the connection method.
If connecting a new dishwasher to a garbage disposal, also verify that the disposal’s internal dishwasher inlet plug has been removed. Missing this small step can prevent the dishwasher from draining at all.
Kitchen Sink Rough-In: Measurements That Matter
This is one area where many kitchen sink plumbing diagrams are too vague.
There is no single universal rough-in height that works for every sink because the correct location depends on several variables:
- cabinet height
- sink depth
- garbage disposal size
- countertop thickness
- trap configuration
- drain diameter
- local plumbing requirements
Rather than relying on one generic number, I prefer working backward from the finished sink.
Start with the sink outlet height. Then account for the disposal or tailpiece, P-trap, required slope, and wall connection.
This method is especially useful when installing farmhouse sinks or deep undermount sinks.
Drain Slope
Horizontal drainage piping generally needs a consistent downward slope toward the building drain.
For many common small-diameter drainage installations, 1/4 inch of fall per horizontal foot is a widely used reference point, although the applicable plumbing code should determine the final requirement.
Too little slope can encourage buildup.
Excessive slope is not automatically better because liquids may move faster than solids under some conditions.
Venting a Kitchen Sink Correctly
A vent may not be the most visible part of a kitchen sink plumbing diagram, but it is critical to how the system works.
Imagine turning a bottle full of water upside down. Without air entering, the water often glugs instead of flowing smoothly.
Drainage systems face a similar pressure problem.
A vent provides air so water can move through the drain without pulling the protective water seal from the trap.
Air Admittance Valve
An air admittance valve, often shortened to AAV, is a mechanical valve that opens when negative pressure develops in the drainage system.
It allows air into the pipe but remains closed under normal conditions to prevent sewer gases from escaping.
AAVs can be useful where running a traditional vent is difficult, including some kitchen island or remodeling situations.
They are not permitted or installed the same way everywhere, so local code should always be checked.
Common Kitchen Sink Plumbing Mistakes
A diagram becomes especially useful when you know what incorrect plumbing looks like.
Using an S-Trap
An S-trap drops vertically after the trap instead of maintaining the properly vented horizontal trap-arm arrangement used in modern plumbing systems.
This configuration can siphon water from the trap and allow sewer gases into the home.
Installing Flexible Accordion Drain Pipe
Flexible accordion-style pipes may seem convenient when fittings do not line up, but their internal ridges can collect grease, food residue, and debris.
I prefer properly fitted smooth-wall drainage components whenever possible.
Putting the Wall Drain Too High
This is especially common after a deeper sink or garbage disposal is added.
If the disposal outlet sits lower than the wall drain, gravity cannot move wastewater uphill.
The correct solution may require lowering the drain connection rather than forcing the components together.
Installing Too Many Traps
A sink generally should not have unnecessary traps connected in series.
More fittings do not make the system safer. They can restrict drainage and create additional clog points.
Ignoring Access
Plumbing should remain serviceable after installation.
Avoid placing storage systems, shelves, or permanent cabinetry where they prevent access to shut-off valves, the P-trap, disposal connections, or cleanout points.
How to Read a Kitchen Sink Plumbing Diagram
When I look at an unfamiliar sink diagram, I trace the system in this order.
First, follow the water supply.
Locate the hot and cold pipes, shut-off valves, flexible hoses, and faucet connections.
Next, follow wastewater from the basin.
Identify the strainer or garbage disposal, then trace the drain through the tailpiece or discharge fitting, P-trap, trap arm, and wall drain.
Finally, locate the vent.
If the diagram does not clearly show how the trap is vented, it is probably not detailed enough to use as an installation reference.
Signs Your Kitchen Sink Plumbing Needs Attention
You do not need to understand every fitting to recognize a problem.
Watch for:
- water leaking inside the cabinet
- recurring drain clogs
- gurgling after the sink drains
- sewage-like odors
- loose slip-joint fittings
- corrosion around valves
- water backing into the second sink bowl
- dishwasher water entering the sink
- disposal leaks
- unusually slow drainage
A single slow drain may only require cleaning. Persistent gurgling, sewer odors, or recurring backups can point to a venting or drainage problem that deserves professional diagnosis.
When DIY Work Makes Sense
Simple jobs such as tightening a slip-joint nut, replacing a removable P-trap, changing a faucet supply hose, or cleaning a strainer may be manageable for an experienced DIYer.
Changes inside walls are different.
Moving the wall drain, modifying vents, relocating supply lines, or altering the plumbing for an island sink can affect code compliance and other parts of the drainage system.
When the repair goes beyond visible under-sink fittings, I recommend confirming the design with a licensed plumber before closing the wall.
FAQs About Kitchen Sink Plumbing Diagrams
What is the correct kitchen sink drain layout?
A typical layout runs from the sink strainer or disposal into a P-trap, then through a properly sloped trap arm to the vented wall drain.
Does a kitchen sink need a vent?
Yes. A properly vented drain helps wastewater flow correctly and protects the water seal inside the P-trap from pressure changes.
Can a dishwasher and kitchen sink use the same drain?
Yes. A dishwasher commonly connects to the garbage disposal or an approved dishwasher branch fitting in the sink’s drainage system.
How far below the sink should the P-trap be?
There is no single measurement for every installation. Its position depends on sink depth, drain height, fittings, and applicable plumbing code.
Why does my kitchen sink gurgle when it drains?
Gurgling can be caused by a partial clog, poor venting, or pressure changes inside the drain system. Recurring gurgling should be investigated rather than ignored.
Final Takeaway
A good kitchen sink plumbing diagram should do more than name the pipes beneath the cabinet. It should show how the supply lines, drain, P-trap, trap arm, vent, garbage disposal, and dishwasher work as one system.
Before replacing a sink or changing the plumbing, compare the planned layout with the actual drain height, sink depth, appliance connections, and local plumbing requirements.
If the diagram does not clearly show drainage direction and venting, get the layout checked before installation. A few minutes spent confirming the design can prevent leaks, odors, drainage problems, and expensive changes after the countertop and cabinets are finished.

Olivia Parker is a home improvement research writer with 8+ years of experience covering home design, renovation ideas, maintenance tips, and practical living solutions. She creates easy-to-follow content to help readers make informed decisions about improving their homes.