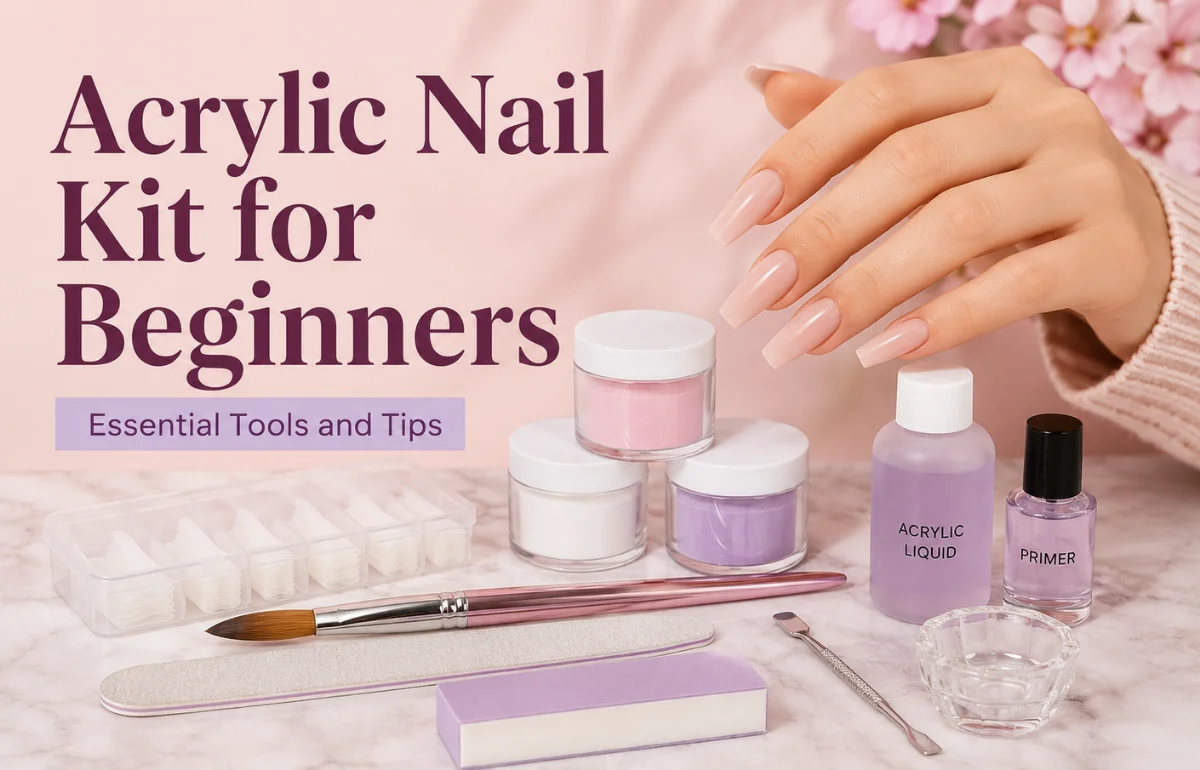
An acrylic nail kit for beginners is a starter collection of products and tools used to create, shape, and finish acrylic nail extensions at home. A proper kit normally contains acrylic powder, liquid monomer, an acrylic brush, nail tips or forms, nail glue, files, a buffer, nail dehydrator, primer, and finishing products. When acrylic powder and monomer are combined, they form a workable bead that gradually hardens into a durable nail enhancement without requiring a UV lamp.
For someone learning acrylic nails, I believe the quality and compatibility of these core products matter far more than the number of accessories inside the box. A beginner-friendly kit should make product control easier, reduce unnecessary guesswork, and give you enough time to practise shaping and placement safely.
What Should an Acrylic Nail Kit for Beginners Include?
Many starter kits advertise 50, 100, or even 200 pieces. That sounds impressive, but a large accessory count does not necessarily mean you are getting a better acrylic system.
I prefer to judge a kit by whether it covers four jobs: nail preparation, acrylic application, shaping, and finishing.
A useful beginner acrylic nail kit should normally contain:
A dust brush, lint-free wipes, cuticle oil, nail clippers, practice tips, and a practice hand are also useful, although they are not essential parts of the acrylic system itself.
How Acrylic Nails Actually Work
Acrylic nails are created by combining a polymer powder with a liquid monomer. The liquid wets the powder and creates a mouldable acrylic bead.
That bead is placed on the prepared nail or extension and shaped before it hardens.
Unlike gel nails, traditional acrylic does not need UV or LED light to create its main structure. The material hardens through the chemical reaction between the acrylic components.
This distinction matters when shopping because some beginner sets include a nail lamp simply to make the package look more complete. You only need a compatible lamp if you plan to apply a gel colour or gel top coat that requires curing.
The FDA explains that artificial nails are primarily made from acrylic polymers created through reactions involving acrylic monomers and polymers.
What Makes an Acrylic Nail Kit Beginner-Friendly?
I would not automatically choose the cheapest kit or the one with the most colours.
For a beginner, control is more valuable than variety.
A Manageable Setting Time
Very fast-setting acrylic may appeal to experienced nail technicians, but it can make learning frustrating.
You need enough working time to place the bead, guide it toward the correct area, flatten it where necessary, and create a balanced surface before the product becomes difficult to move.
A medium-working acrylic system is usually more forgiving.
Compatible Powder and Monomer
One detail that deserves more attention is product compatibility.
Buying random powder, monomer, primer, and additives from unrelated brands may create unpredictable results because professional nail systems are often formulated around specific product combinations.
For my own buying checklist, I give extra value to kits where the manufacturer clearly identifies the powder and liquid as one acrylic system.
It removes one variable from the learning process.
A Brush You Can Actually Control
An oversized acrylic brush can hold more liquid and create larger beads, but that does not make it automatically better for someone learning at home.
A size 8, 10, or sometimes 12 brush gives many beginners a practical balance between product capacity and control.
Brush quality also matters. A brush that loses its shape, splits at the tip, or becomes clogged quickly makes product placement unnecessarily difficult.
Useful Nail Tip Sizes
Check how many sizes are included rather than only counting the total number of tips.
A nail extension should fit properly from sidewall to sidewall without being forced onto the natural nail.
Having several widths available makes fitting easier and reduces excessive filing.
My Beginner Readiness Test for Acrylic Nail Kits
A useful way to compare starter kits is to ignore the marketing claims and score the contents yourself.
I use five questions:
- Does it include a complete powder-and-monomer system?
- Does it include proper nail preparation products?
- Is the acrylic brush suitable for controlled application?
- Are shaping tools and several tip sizes provided?
- Does the manufacturer clearly identify ingredients, instructions, and product use?
A kit meeting four or five of these conditions is much more valuable to a beginner than a huge box filled mainly with glitter, rhinestones, stickers, and decorative accessories.
That is one area where I think many online buying guides miss the point: beginners do not primarily need more nail art. They need fewer variables.
Nail Tips vs Nail Forms for Beginners
Both methods can produce acrylic extensions, but the learning experience is different.
I normally recommend starting with nail tips because they give you a physical structure before acrylic is applied.
Once you can control bead consistency, product placement, filing, and apex construction, forms become easier to understand.
The Most Important Skill: Getting the Acrylic Bead Right
Buying a good acrylic nail kit for beginners helps, but it cannot replace learning liquid-to-powder control.
If your brush carries too much monomer, the bead can become wet, runny, and difficult to control.
If the bead contains too much powder, it can appear dry, grainy, or difficult to smooth.
Instead of trying to memorise one universal liquid-to-powder ratio, I recommend learning to read the material.
A workable bead should stay together when picked up, settle gradually after placement, and remain smooth enough to manipulate without immediately flooding the surrounding skin.
This visual feedback is more useful than obsessing over a mathematical ratio because brush size, powder formulation, temperature, and monomer behaviour can all affect application.
Practise Before Doing a Full Set
One of the smartest things a beginner can buy is not another acrylic colour. It is a pack of inexpensive practice tips.
Practise picking up similar-sized beads and placing them repeatedly.
Then practise creating a smooth transition, controlled sidewalls, a balanced apex, and an even free edge.
Doing this before completing ten nails saves product and makes it easier to identify what is actually going wrong.
If every bead behaves differently, practise liquid control.
If the application looks good but the finished nail is uneven, practise filing.
If extensions lift quickly, review preparation, skin contact, product compatibility, and application around the cuticle area.
This kind of problem-based practice is far more efficient than repeatedly completing full sets without understanding the cause of each mistake.
Acrylic Nail Safety Beginners Should Know
Acrylic nail products should be treated as cosmetic chemicals, not ordinary craft supplies.
The FDA advises consumers to follow nail-product directions, pay attention to warnings, ensure good ventilation, and avoid unnecessary skin exposure. Methacrylate monomers can cause reactions including redness, swelling, and pain in people who become sensitised.
Check the Type of Monomer
I would avoid a beginner nail kit using methyl methacrylate, commonly shortened to MMA, as its acrylic liquid.
The FDA previously received reports of fingernail damage, deformity, and contact dermatitis associated with artificial nail products containing liquid MMA and took enforcement action against products containing 100% MMA monomer. Ethyl methacrylate, or EMA, is used in acrylic nail systems, but skin contact should still be avoided because sensitisation is possible.
Do not assume that a strong smell alone tells you which monomer is present. Check the label and product documentation.
Keep Acrylic Off the Skin
Do not deliberately allow wet acrylic product to sit against your cuticle or surrounding skin.
Apart from making the finished application look untidy, repeated contact with reactive nail ingredients may increase the risk of irritation or sensitisation.
If you notice persistent redness, swelling, itching, pain, or another unusual reaction, stop using the product and seek appropriate medical advice.
Work With Proper Ventilation
Opening the acrylic bottle and working in a tiny closed bedroom is not a good setup.
NIOSH recommends controlling exposure to ethyl methacrylate vapour with effective ventilation and keeping product bottles tightly closed when they are not being used. Local exhaust ventilation positioned near the work area is particularly effective in professional environments.
At home, choose a well-ventilated working space and close monomer containers immediately after use.
Do Not Over-File the Natural Nail
Your goal during preparation is not to grind away layers of the natural nail.
Artificial nail application already involves roughening the nail surface, and dermatologists warn that this process can thin and weaken natural nails. Acrylic removal and frequent maintenance may also contribute to brittle or damaged nails.
Use controlled pressure and avoid aggressive filing.
Common Beginner Mistakes That Make Acrylic Nails Lift
Lifting is one of the first problems new users encounter.
It does not always mean the acrylic powder is bad.
Common causes include:
- Acrylic touching the cuticle or surrounding skin
- Poor removal of surface oil
- Inadequate nail preparation
- Excessive dust left on the nail
- Incorrect primer use
- An acrylic bead that is too wet
- Product applied too close to the skin
- Poorly fitted nail tips
- Mixing products that do not work well together
When troubleshooting, change one thing at a time.
If you change the brush, monomer, powder, primer, filing method, and preparation routine simultaneously, you will never know which change solved the problem.
How Much Should a Beginner Spend?
There is no fixed price that guarantees quality.
I would rather purchase a smaller kit with reliable acrylic powder, clearly labelled monomer, a usable brush, preparation products, and basic shaping tools than spend money on a giant package dominated by decorations.
Also consider replacement cost.
Your powder, monomer, files, glue, primer, and tips will eventually run out. Before committing to a starter system, check whether its essential components can be purchased separately.
That small detail can prevent you from having to replace the entire kit just because you finished one bottle.
Do Beginners Need an Electric Nail Drill?
No.
An electric nail drill can speed up removal, debulking, refinement, and certain preparation tasks, but it introduces another skill that must be learned safely.
Manual files are slower but give a beginner more immediate feedback about pressure and material removal.
I would learn basic hand filing first.
If you later buy an e-file, learn what each bit is designed for and practise before using it aggressively on natural nails.
What I Would Buy for My First Acrylic Setup
If I were choosing an acrylic nail kit for beginners today, I would prioritise a surprisingly simple setup:
A compatible powder and EMA-based monomer system, one reliable acrylic brush, clear or natural nail tips in several sizes, glue, dehydrator, primer, 100/180 files, a buffer, a glass dappen dish, cuticle oil, lint-free wipes, and plenty of practice tips.
I would choose consistency over colour variety.
Once your product control improves, adding coloured powders, nail art, sculpting forms, an e-file, gel colours, or more advanced brushes makes sense.
Your first purchase should teach you acrylic technique rather than distract you from it.
How Long Can Acrylic Nails Last?
Acrylic enhancements can remain wearable for several weeks, but natural nails continue growing underneath them.
The American Academy of Dermatology notes that people wearing acrylic nails for extended periods typically require touch-ups every two to three weeks as the natural nail grows.
Longevity also depends on preparation, application quality, nail growth, daily activity, and maintenance.
Do not simply glue or cover a lifted area. Moisture and debris can become trapped beneath compromised enhancement material, so significant lifting should be addressed properly.
Choosing Your First Acrylic Nail Kit
The best beginner kit is not necessarily the most colourful, expensive, or heavily advertised option.
Look for a controllable acrylic system, clearly labelled products, an appropriate brush, good preparation tools, multiple nail-tip sizes, usable files, and straightforward instructions.
Most importantly, give yourself room to practise.
Start with individual practice tips rather than expecting a salon-level full set immediately. Once you can consistently control the bead, place the acrylic without touching skin, create a balanced structure, and file the surface cleanly, the decorative side of acrylic nails becomes much easier.
Choose your starter kit based on learning value first. Your technique will ultimately make a bigger difference than the number of products inside the box.
Frequently Asked Questions
What do I need in an acrylic nail kit for beginners?
You need acrylic powder, liquid monomer, an acrylic brush, nail tips or forms, files, a buffer, dehydrator, primer, and basic finishing supplies.
Do you need a UV lamp for acrylic nails?
No. Traditional acrylic powder and monomer harden without a UV lamp. A lamp may be required only if you apply a UV/LED-cured gel polish or gel top coat afterward.
Are acrylic nails hard to do for beginners?
There is a learning curve, particularly with liquid-to-powder control, product placement, shaping, and filing. Practising on nail tips before doing a full set makes the process much easier.
How long do acrylic nails last for beginners?
A properly applied set may stay wearable for several weeks, although maintenance is commonly needed every two to three weeks as the natural nail grows.
Should a beginner use nail tips or forms for acrylic nails?
Nail tips are generally easier because they provide a ready-made extension shape. Forms offer more customisation but require better control of acrylic structure and sculpting.

Olivia Parker is a home improvement research writer with 8+ years of experience covering home design, renovation ideas, maintenance tips, and practical living solutions. She creates easy-to-follow content to help readers make informed decisions about improving their homes.